Who is this for?
This tutorial is for Angular developers who wants to integrate datetime picker in their application. Angular Material Datetime picker can be used in Angular versions 7 - 14.
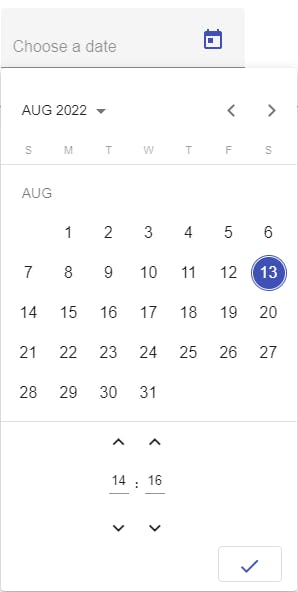
We have few datetime pickers available for angular and one of them is Angular Material Datetime picker which is easy to use and having good UI/UX. So we will see how to integrate them in angular.
npm package - https://www.npmjs.com/package/@angular-material-components/datetime-picker

The above package extends the functionality of Angular material Datepicker by adding time picker to it.
Step 1: Add required npm packages
Follow the below steps to install the necessary packages.
//Angular material & datetime picker
npm install --save @angular/material
npm install --save  @angular-material-components/datetime-picker

//Add moment related packages since we are using to parse the date
npm install moment
npm install --save @angular/material-moment-adapter
npm install @angular-material-components/moment-adapter
//Others
npm install @angular/platform-browser
Install Angular material then datetime picker package. Since moment supports various parsing formats and different locales, we are installing the same with related packages.
Note: We are installing Angular Material Datetime Picker version 8.x+ for our Angular application based on version 14. If you have different Angular version, please refer the above npm page and install corresponding version.
Step 2: NgModule changes with date format
Update NgModule import & providers section as below.
imports: [
    ...
    FormsModule,  //Required for form controls
    MatDatepickerModule, //Material datepicker module
    NgxMatDatetimePickerModule, //Datetime picker module
    MatInputModule, //Required for material input
    BrowserAnimationsModule //Required for animation
  ],
  providers: [
...
{
    provide: NgxMatDateAdapter,
    useClass: NgxMatMomentAdapter, //Moment adapter
    deps: [MAT_DATE_LOCALE, MAT_MOMENT_DATE_ADAPTER_OPTIONS]
  },
{ provide: NGX_MAT_DATE_FORMATS, useValue: MY_NGX_DATE_FORMATS }]
We are customizing the datetime picker format by providing custom NGX_MAT_DATE_FORMATS. You can either declare below custom format value in NgModule file or any other place in angular.
const MY_NGX_DATE_FORMATS: NgxMatDateFormats = {
  parse: {
    dateInput: "l, LTS"
  },
  display: {
    dateInput: "DD.MM.yyyy HH:mm",
    monthYearLabel: "MMM YYYY",
    dateA11yLabel: "LL",
    monthYearA11yLabel: "MMMM YYYY"
  }
};
Step 3: Theming & other customization
Import material theme or your custom theme in syles.css file.
@import '~@angular/material/prebuilt-themes/deeppurple-amber.css';
To get font and icon support, add below material design icon font to your index.html
<link href="https://fonts.googleapis.com/icon?family=Material+Icons&display=block" rel="stylesheet">
Step 4: Using in Angular Component
We are done with importing all the necessary packages and configured the same in NgModule. Now we can use the below code to add the datetime picker to our Angular component html.
<mat-form-field>
  <input matInput [ngxMatDatetimePicker]="picker" placeholder="Choose a date" [(ngModel)]="selectedDate">
  <mat-datepicker-toggle matSuffix [for]="$any(picker)">
  </mat-datepicker-toggle>
  <ngx-mat-datetime-picker #picker [showSpinners]="true">
  </ngx-mat-datetime-picker>
</mat-form-field>
<br>
Moment Date - {{selectedDate}} <br>
Javascript Date - {{selectedDate?.toDate()}}
Declare datetime picker model with default value in typescript file as below
selectedDate?: moment.Moment = moment(new Date());
That's it, we are successfully integrated Angular material Datetime picker. Now you may run the application with ng serve and check whether everything is working fine.
Checkout the complete code in the github
Step 5: Customization and additional options
Here I have demonstrated how to integrate the datetime picker in angular application with basic functionalities. The same steps are applicable for Timepicker too.
You can refer the above npm page for additional options and further customization.
Happy coding 😊
