
VS Code setup for C# development
Step by step instructions with Hello World example


Microsoft’s Visual Studio Code (VS Code) is a popular code editor that supports a wide range of programming languages, including C#. In this blog post, you will learn the process of setting up VS Code for C# development with a simple “Hello World” example.
Why VS Code?
There are several advantages of using VS Code for C# development. Here are some of them:
Cross-platform support: VS Code is a cross-platform code editor that can run on Windows, Linux, and macOS. This makes it easy to develop C# applications on any platform.
Rich C# editing experience: VS Code provides a rich C# editing experience, powered by Roslyn and C# Dev Kit. You can use features such as IntelliSense, formatting, linting, code fixes, refactorings, and more to write and improve your code.
AI-powered development: VS Code supports GitHub Copilot, an AI-powered code completion tool that helps you write code faster and smarter. You can use the GitHub Copilot extension in VS Code to generate code or to learn from the code it generates.
Integrated testing experiences: VS Code supports debugging of C# applications running on either .NET or Mono. You can use the C# Dev Kit extension to debug your C# applications.
Solution management: VS Code provides a solution explorer that helps you manage your C# projects and solutions.
Extensibility: VS Code is highly extensible and has a large number of extensions available for C# development.
Install VS Code and dependencies
Install the following required software/extensions one by one.
Install VS Code: If you haven’t already done so, download and install VS Code from the official website.
Install C# Dev Kit extension: Install the C# extension for VS Code, which provides a rich C# editing experience, powered by Roslyn and C# Dev Kit.
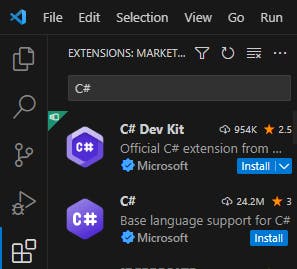
Install .NET SDK: Install the latest .NET SDK, which is required to build and run .NET applications
Create your first project
Now you are ready to build your first C# project. Open VS Code and create a new project by following these steps:
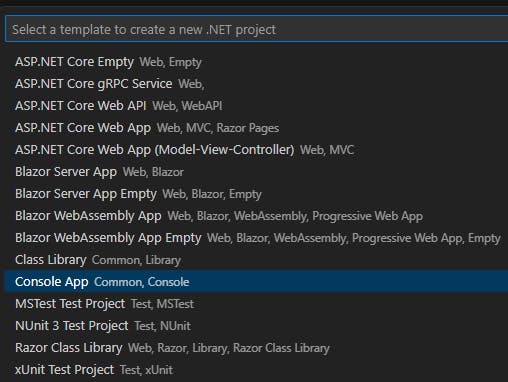
Open the Command Palette by pressing
Ctrl+Shift+P(Windows, Linux) orCmd+Shift+P(macOS).Type “.NET” in the Command Palette and select “.NET: New Project” --> "Console App".
Select a folder path for "Project Location"
Type name of the new project Ex. ConsoleAppDemo and press Enter.

- The next screen might show like "Do you trust the authors of the files in this folder?" and if so, click "Yes".
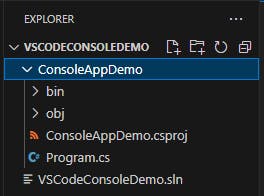
That's it, now new console project is created with minimum essential files.
Creating a "Hello World" project
Go to Explorer, open "Program.cs" and write the below code (The below code might be present already).
Console.WriteLine("Hello, World!");
Now, run the project by pressing the Ctrl+F5 key or by going "Run" menu and selecting "Run Without Debugging". Alternatively, you can go to Terminal and type dotnet run inside the project directory.
If the below prompt asks you to select a debugger, select C# and press enter.

Now the project-building activity will start and finally execute the given code.
Viola, the "Hello, World!" message is printed on the "Debug Console".
Final Summary
You have completed the VS Code setup for C# development along with your first Hello World example in C#. For more details and learning, please go to the below reference links.
References:
Get started with C# and .NET in Visual Studio Code
Learn C# | Free tutorials, courses, videos, and more | .NET (microsoft.com)