
JWT authentication in ASP.NET Core Web API
Authentication and role-based authorization with example code


Table of contents
What is JSON Web Token (JWT)?
JSON Web Token (JWT) is a secure and compact way of transmitting information between parties as a JSON object. It consists of three parts: header, payload, and signature. The header contains the algorithm used to sign the token, the payload contains the claims, and the signature is used to verify the authenticity of the token. JWTs are commonly used for authentication and authorization purposes in web applications.
Compared to other token formats, JWT has several benefits:
Compactness: JWT is a compact format that can be easily transmitted over the network.
Self-contained: JWT contains all the necessary information within itself, which means that it does not require any additional lookup to validate the token.
Security: JWT can be signed using a secret (with the HMAC algorithm) or a public/private key pair using RSA or ECDSA. This makes JWTs secure and tamper-proof.
Ease of use: JWT is easy to use and can be integrated with various programming languages and frameworks.
Create a minimal API project in Visual Studio Code.
Please follow the instructions here if you do not already have VS Code and the C# Dev kit is installed.
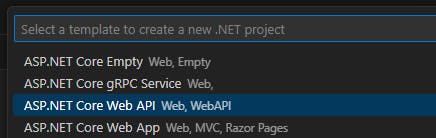
Open Visual Studio Code -> Explorer -> Create .NET Project -> select ASP.NET Core Web API project as shown in the below image and select the project folder location.
This will create a new API project with the weather data endpoint.
Test it using Swagger
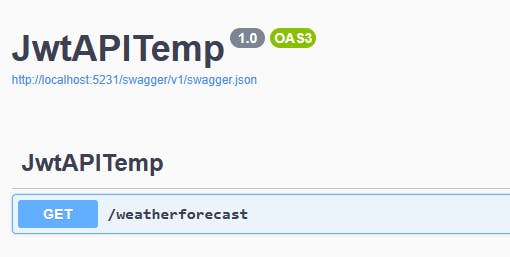
Click the F5 key, select the C# from the debugger list and default Launch configuration (it will be asked the first time). The Swagger API page will open with endpoints.
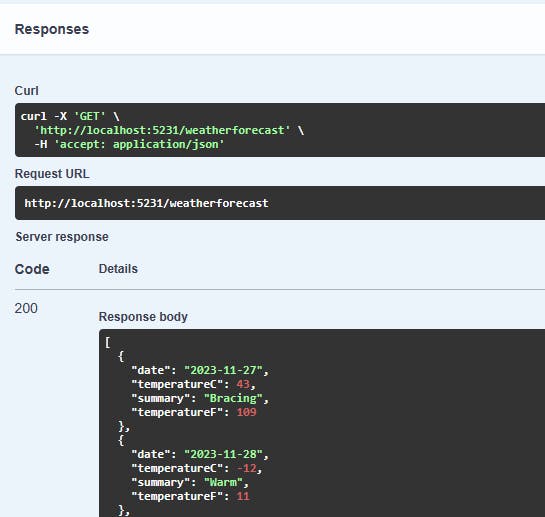
Select the "weatherforecast" endpoint, click "Try it out" and click the "Execute" button. Congratulations, now you can see the result as like below. The URL http://localhost:5231/weatherforecast can be tested using Postman or similar tools.
Implement the JWT authentication step-by-step
Follow the below steps one by one to implement the JWT authentication and implement the authorization with the "admin" role.
Add the JWT nuget package
Execute the below command in the terminal to install the JwtBearer package. Make sure you are running the below command in the project folder.
dotnet add package Microsoft.AspNetCore.Authentication.JwtBearer
Add JWT secrets in appsettings.json
Before proceeding, you should first add JWT secure key and other necessary details in the appsettings.json.
 "Jwt": {
    "Issuer": "https://rajasekar.dev/",
    "Audience": "https://rajasekar.dev/",
    "Key": "This is a secure key, requires a key size of at least '128' bits"
  }
Configure JWT authentication and authorization
Add the below namespaces as we are going to use the same in the project
using System.IdentityModel.Tokens.Jwt;
using System.Security.Claims;
using System.Text;
using Microsoft.AspNetCore.Authentication.JwtBearer;
using Microsoft.AspNetCore.Authorization;
using Microsoft.IdentityModel.Tokens;
using Microsoft.OpenApi.Models;
Add authentication and authorization services as below.
builder.Services.AddAuthentication(options =>
{
    options.DefaultAuthenticateScheme = JwtBearerDefaults.AuthenticationScheme;
    options.DefaultChallengeScheme = JwtBearerDefaults.AuthenticationScheme;
    options.DefaultScheme = JwtBearerDefaults.AuthenticationScheme;
}).AddJwtBearer(o =>
{
    o.TokenValidationParameters = new TokenValidationParameters
    {
        ValidIssuer = builder.Configuration["Jwt:Issuer"],
        ValidAudience = builder.Configuration["Jwt:Audience"],
        IssuerSigningKey = new SymmetricSecurityKey
(Encoding.UTF8.GetBytes(builder.Configuration["Jwt:Key"] ?? string.Empty)),
        ValidateIssuer = true,
        ValidateAudience = true,
        ValidateLifetime = true,
        ValidateIssuerSigningKey = true,
        ClockSkew = TimeSpan.Zero //required if the expire time is <5 minutes
    };
});
//Adding authorization
// builder.Services.AddAuthorization(); //Used if no authorization policy required
builder.Services.AddAuthorizationBuilder()
  .AddPolicy("admin_policy", policy => policy.RequireRole("admin"));
Here we are adding JWT-bearer authentication using the default scheme and configuring TokenValidationParameters with a secure key along with other necessary values.
Using AddAuthorizationBuilder, we are adding a new policy admin_policy to authorize admin roles.
These settings will be used to validate the JWT token when a request comes to API.
Now you should enable the authentication and authorization with the below code.
app.UseAuthentication();
app.UseAuthorization();
How to Create a JWT Token: Generate a Login Endpoint to Authenticate Users
First, create a new login model to use in the login endpoint
record Login(string Email, string Password);
Now we can create a new login endpoint with the below code.
//Login endpoint that returns Jwt token on successful authentication
app.MapPost("/login", [AllowAnonymous] (Login user) =>
{
    var normalUser = AuthenticateNormalUser(user);
    var adminUser = AuthenticateAdminUser(user);
    if (!(normalUser || adminUser))
        return Results.Unauthorized();

    var issuer = builder.Configuration["Jwt:Issuer"];
    var audience = builder.Configuration["Jwt:Audience"];
    var key = Encoding.ASCII.GetBytes(builder.Configuration["Jwt:Key"] ?? string.Empty);
    var claims = new List<Claim>()
        {
            new Claim("Id", Guid.NewGuid().ToString()),
            new Claim(JwtRegisteredClaimNames.Sub, user.Email),
            new Claim(JwtRegisteredClaimNames.Email, user.Email),
            new Claim(JwtRegisteredClaimNames.Jti, Guid.NewGuid().ToString())
        };
    if (adminUser)
    {
        claims.Add(new Claim(ClaimTypes.Role, "admin"));
    }
    var tokenDescriptor = new SecurityTokenDescriptor
    {
        Subject = new ClaimsIdentity(claims),
        Expires = DateTime.UtcNow.AddMinutes(5), //should be at least 5 minutes - https://github.com/IdentityServer/IdentityServer3/issues/1251
        Issuer = issuer,
        Audience = audience,
        SigningCredentials = new SigningCredentials(new SymmetricSecurityKey(key), SecurityAlgorithms.HmacSha512Signature)
    };
    var tokenHandler = new JwtSecurityTokenHandler();
    var token = tokenHandler.CreateToken(tokenDescriptor);
    var stringToken = tokenHandler.WriteToken(token);
    return Results.Ok(stringToken);
});
static bool AuthenticateNormalUser(Login user)
{
    //Check the given user credential is valid - Usually this should be checked from database
    return user.Email == "hello@example.com" && user.Password == "pass123";
}
static bool AuthenticateAdminUser(Login user)
{
    //Check the given user credential is valid - Usually this should be checked from database
    return user.Email == "admin@example.com" && user.Password == "admin123";
}
We have created two methods AuthenticateNormalUser and AuthenticateAdminUser to validate the user's credentials and decide whether the user is a normal or an admin user.
For the sake of simplicity, we are not using the database logic to check the user's credentials.
At least any one of the above methods should return True to authenticate users but for admin access the method AuthenticateAdminUser must return True. If both are not true, the unauthorized error will be thrown.
The issuer, audience, and secure key details are used from the appsettings.json file to create tokens. We are adding user details to tokens like UserId and email via Claims. Additionally, an "admin" role will be added to the claims if the user is an admin.
Finally new SecurityTokenDescriptor object will be created with all the above values and the token will be created using JwtSecurityTokenHandler.
Add the endpoints with authorization
Add the below secure endpoints, one for a regular authenticated user and another one for an admin user. Admin endpoint added with admin_policy which will be validated before accessing the admin page.
//Secure endpoint - All users
app.MapGet("/secure-page", () =>
{
    return "secure page - for all authenticated users 🔐";
})
.RequireAuthorization();

//Secure endpoint - admin user
app.MapGet("/admin-page", () =>
{
    return "Admin page - only for admin users 🔐";
})
.RequireAuthorization("admin_policy");
Adding authorization bearer token support in Swagger UI (optional)
To test the above endpoints using Postman or similar tools, this step is not required.
Since we are using SwaggerUI, you should add the following code for JWT token support just below the builder.Services.AddEndpointsApiExplorer().
builder.Services.AddSwaggerGen(option =>
{
    option.SwaggerDoc("v1", new OpenApiInfo { Title = "Web API with Jwt Authentication", Version = "v1" });
    option.AddSecurityDefinition("Bearer", new OpenApiSecurityScheme
    {
        In = ParameterLocation.Header,
        Description = "Please enter a valid token",
        Name = "Authorization",
        Type = SecuritySchemeType.Http,
        BearerFormat = "JWT",
        Scheme = "Bearer"
    });
    option.AddSecurityRequirement(new OpenApiSecurityRequirement
    {
        {
            new OpenApiSecurityScheme
            {
                Reference = new OpenApiReference
                {
                    Type=ReferenceType.SecurityScheme,
                    Id="Bearer"
                }
            },
            new string[]{}
        }
    });
});
Testing the JWT authentication
You can either run dotnet run in the terminal or press the F5 key to run the application.
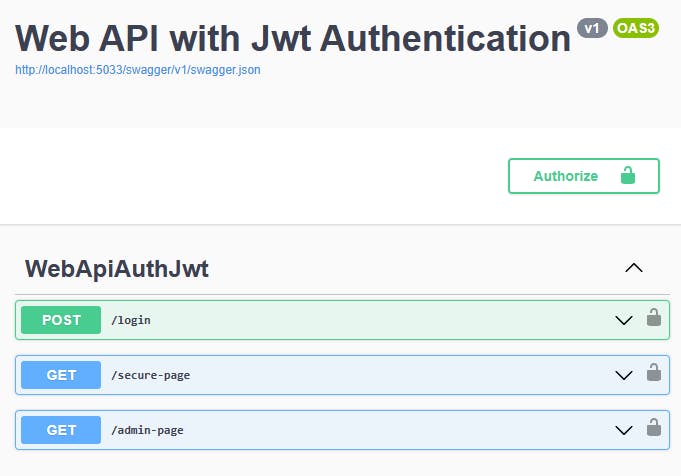
The application will be running in the localhost with any port that is mentioned in the terminal. Open the localhost link (ex. http://localhost:5033/swagger/index.html) in the browser and it will look like below.
Click login endpoint -> "Try it out", use the below values in the request body and click execute.
{
  "email": "hello@example.com",
  "password": "pass123"
}
The result will look like below.

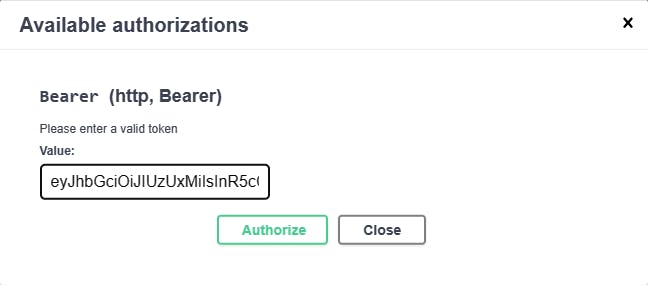
Copy the token, click the "Authorize" button, past it, click the Authorize button and close the popup. Now the page is saved with a valid JWT token.
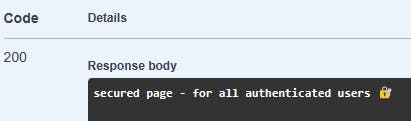
Now test the secure-page and the successful output will look like below.
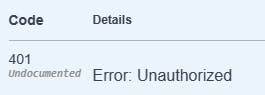
If the user is not authorized or the authorization token is expired, the below 401 error will be shown.
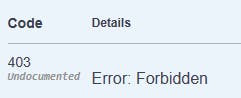
Test the admin-page and it will show the 403 error because the above user is authenticated successfully but not authorized to view the admin page.
Again, go to the login endpoint and use the below admin user to log in. Save the generated token in the "Authorize" section.
{
  "email": "admin@example.com",
  "password": "admin123"
}
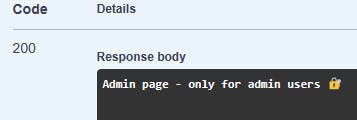
Now test the endpoint admin-page and it will show the below successful result. Even secure-page endpoint will work with the above admin credentials.
Complete source code
Find the complete source code of the Program.cs below.
using System.IdentityModel.Tokens.Jwt;
using System.Security.Claims;
using System.Text;
using Microsoft.AspNetCore.Authentication.JwtBearer;
using Microsoft.AspNetCore.Authorization;
using Microsoft.IdentityModel.Tokens;
using Microsoft.OpenApi.Models;

var builder = WebApplication.CreateBuilder(args);
builder.Services.AddEndpointsApiExplorer();

//Adding authorization bearer token support in Swagger UI
builder.Services.AddSwaggerGen(option =>
{
    option.SwaggerDoc("v1", new OpenApiInfo { Title = "Web API with Jwt Authentication", Version = "v1" });
    option.AddSecurityDefinition("Bearer", new OpenApiSecurityScheme
    {
        In = ParameterLocation.Header,
        Description = "Please enter a valid token",
        Name = "Authorization",
        Type = SecuritySchemeType.Http,
        BearerFormat = "JWT",
        Scheme = "Bearer"
    });
    option.AddSecurityRequirement(new OpenApiSecurityRequirement
    {
        {
            new OpenApiSecurityScheme
            {
                Reference = new OpenApiReference
                {
                    Type=ReferenceType.SecurityScheme,
                    Id="Bearer"
                }
            },
            new string[]{}
        }
    });
});

//Configure Jwt authentication
builder.Services.AddAuthentication(options =>
{
    options.DefaultAuthenticateScheme = JwtBearerDefaults.AuthenticationScheme;
    options.DefaultChallengeScheme = JwtBearerDefaults.AuthenticationScheme;
    options.DefaultScheme = JwtBearerDefaults.AuthenticationScheme;
}).AddJwtBearer(o =>
{
    o.TokenValidationParameters = new TokenValidationParameters
    {
        ValidIssuer = builder.Configuration["Jwt:Issuer"],
        ValidAudience = builder.Configuration["Jwt:Audience"],
        IssuerSigningKey = new SymmetricSecurityKey(Encoding.UTF8.GetBytes(builder.Configuration["Jwt:Key"] ?? string.Empty)),
        ValidateIssuer = true,
        ValidateAudience = true,
        ValidateLifetime = true,
        ValidateIssuerSigningKey = true,
        ClockSkew = TimeSpan.Zero //required if the expire time is <5 minutes
    };
});
//Adding authorization
// builder.Services.AddAuthorization(); //Used when no authorization policy is required, otherwise use below AddAuthorizationBuilder
builder.Services.AddAuthorizationBuilder()
  .AddPolicy("admin_policy", policy => policy.RequireRole("admin"));

var app = builder.Build();

// Configure the HTTP request pipeline.
if (app.Environment.IsDevelopment())
{
    app.UseSwagger();
    app.UseSwaggerUI();
}

app.UseHttpsRedirection();

//Enable Authentication and Authorization
app.UseAuthentication();
app.UseAuthorization();

//Login endpoint that returns Jwt token on successful authentication
app.MapPost("/login", [AllowAnonymous] (Login user) =>
{
    var normalUser = AuthenticateNormalUser(user);
    var adminUser = AuthenticateAdminUser(user);
    if (!(normalUser || adminUser))
        return Results.Unauthorized();

    var issuer = builder.Configuration["Jwt:Issuer"];
    var audience = builder.Configuration["Jwt:Audience"];
    var key = Encoding.ASCII.GetBytes(builder.Configuration["Jwt:Key"] ?? string.Empty);
    var claims = new List<Claim>()
        {
            new Claim("Id", Guid.NewGuid().ToString()),
            new Claim(JwtRegisteredClaimNames.Sub, user.Email),
            new Claim(JwtRegisteredClaimNames.Email, user.Email),
            new Claim(JwtRegisteredClaimNames.Jti, Guid.NewGuid().ToString())
        };
    if (adminUser)
    {
        claims.Add(new Claim(ClaimTypes.Role, "admin"));
    }
    var tokenDescriptor = new SecurityTokenDescriptor
    {
        Subject = new ClaimsIdentity(claims),
        Expires = DateTime.UtcNow.AddMinutes(5), //should be at least 5 minutes - https://github.com/IdentityServer/IdentityServer3/issues/1251
        Issuer = issuer,
        Audience = audience,
        SigningCredentials = new SigningCredentials(new SymmetricSecurityKey(key), SecurityAlgorithms.HmacSha512Signature)
    };
    var tokenHandler = new JwtSecurityTokenHandler();
    var token = tokenHandler.CreateToken(tokenDescriptor);
    var stringToken = tokenHandler.WriteToken(token);
    return Results.Ok(stringToken);
});
static bool AuthenticateNormalUser(Login user)
{
    //Check the given user credential is valid - Usually this should be checked from database
    return user.Email == "hello@example.com" && user.Password == "pass123";
}
static bool AuthenticateAdminUser(Login user)
{
    //Check the given user credential is valid - Usually this should be checked from database
    return user.Email == "admin@example.com" && user.Password == "admin123";
}

//Secure endpoint - All users
app.MapGet("/secure-page", () =>
{
    return "secure page - for all authenticated users 🔐";
})
.RequireAuthorization();

//Secure endpoint - admin user
app.MapGet("/admin-page", () =>
{
    return "Admin page - only for admin users 🔐";
})
.RequireAuthorization("admin_policy");

app.Run();

//Login user model
record Login(string Email, string Password);
Some key points
No logout option is possible because of no cookie option. You should manually remove the stored JWT token from the client-side application but still, the token is valid until it expires.
Generally the token
Expiressetting should be a minimum of 5 minutes (refer https://github.com/IdentityServer/IdentityServer3/issues/1251).
Conclusion
You should now understand how to implement the JWT authentication in ASP.NET Core Web API with role-based authorization.
References:
JSON Web Token Introduction - jwt.io
How to implement JWT authentication in ASP.NET Core 6 | InfoWorld
Authentication and authorization in minimal APIs | Microsoft Learn
Role based JWT Tokens in ASP.NET Core APIs - Rick Strahl's Web Log (west-wind.com)